Monday, May 30, 2011

Starting at the Top

It's a special Memorial Day posting to The Dollhouse Project. Okay there's really nothing special about this post compared to any of the others, except a heartfelt thanks to my all-time favorite veteran, who also happens to be the builder of the dollhouse. Love you!

I have two ceilings covered and I think I'm up to 6 lights now. Wanna see?

The first three lights:
And just because I like to be obnoxious and draw on pictures,
We've already zoomed in on the carriage light on the outside by the front door before. But here's a close-up of the other main floor light from the inside of the house:
Cool huh? There will be ceiling coverings, wallpaper, and flooring. So the almost 50 ft of tapewire I put in the house won't show when it's all over. Yes I said I put almost 50 ft of tapewire into the house. I might be insane! But I'm veering off-topic. I think that lamp is just perfect for over a pool table. Oh, I also had to fix the chain because it had broken. And I bought an adapter so I can just plug the lamp into the ceiling instead of hard-wiring it in. It's removable now! I should have taken a picture of that. I will when I do the ceiling in there. I also should have taken pictures of the process of fixing the thing and installing the adapter. That took an ENTIRE afternoon! Luckily the dollhouse is in the basement and we were having 3 waves of severe thunderstorms that day... I just spent the whole day in the basement. Working on the dollhouse.

Wait, did I just say "luckily we were having severe thunderstorms"?!? I totally did not mean that! Oh seriously, you know what I meant.

Anyway, moving on to the other light from that first picture. It's the ceiling fan in the parents' bedroom. I've decided to not even bother worrying about what era this house is... because any house that has a ceiling fan in one room and a high-tank toilet and wringer washtub in another room is just a mish-mash of this that and the other thing. I like everything in the house so I'm not worrying about it! Also included in the following picture is the bare bulb on the far side of the bathroom.
Oh, so much to explain! At the bottom of the picture is the ceiling fan, also with a shiny new plug-n-play adapter. The upper room is the afore-mentioned bathroom with the bare bulb. That end of the bathroom is going to be the laundry space and I just thought it needed the random exposed bare lightbulb with a pull-chain on it. Haven't installed the chain yet (and the chain will be for looks only, that's an always-on-if-the-house-is-on wiring job) but there's the light. There will eventually be another light on the other side of the room, over the bathroom sink. Also, please note my fancy ceiling covering. Now you can't see the tapewire anymore! It's the kind of paper that grown-ups make watercolor paintings on. As opposed to the Disney Princesses coloring book that children make watercolor paintings on. Here's a bit of a zoom-in, you can see the texture of the paper:
If you click on the picture, it should make it even bigger. I'm so excited for ceilings! (the color balance in the picture is a bit off, the paper really is pure white) Those are the only two rooms where I've finished the ceilings. I don't want to do any more until I decide whether or not there will be lights in those rooms. And if there are, until I have decided what and where.

I'm really the queen of sentence fragments, aren't I?

Poor grammar not withstanding, let's move on to the last light I'll be showing in this post. First of all, a picture of the upstairs space after I busted out the partition wall.
Don't worry, the wall is coming back. Actually I built a new wall so it will fill the space all the way. The original wall had openings on both ends. So I'm rebuilding. Actually I have rebuilt. You'll kind of see it in the next picture, although it's just sitting in place there. Not actually glued in yet. But it does exist! And I've been hanging around Dan too much, I said "actually" three times in one paragraph.  A good writer would go back and edit that.  Nah.

The other thing from this picture is the white paint I put on the ceilings/angle walls. I had hoped it would cover and I could just call that good. But, as you can plainly see, even three coats didn't cover the tapewire. Ugh. It would have been so much easier to just paint than to have to measure the paper, cut, remeasure, cuss, throw away, get a new piece, measure again, paste, hold in place while the paste dries, get paste on the outside of the paper, cuss.... well, you get the idea. But I do admit that the textured paper looks way better than paint would have. Also I have no idea why the bathroom sink and the loveseat are in there. This house is currently a mess. And my previously referenced second light to go in the bathroom will only be put over the sink once the sink is actually in the bathroom!

Wait, wasn't this supposed to be about the light?
I know, kind of boring. Just another bare bulb. But once I put that horizontal board in... you know, this one:
(as seen in this post: Demolition!) that space will just be attic, and bare bulbs are perfect for attic spaces. Of course that means I'll have to install more lights in the room below the attic space, but did I mention I ran 50 ft of tapewire through the house? I bet I can make it happen.

There is one more light in place, but I'm not showing it yet. It's a bit of a weird thing and I don't even know if I'll be able to pull it off, so I'm saving it for later. I'm such a tease!

However, I do have a couple other randomly unrelated things to show. First of all, I fixed Doll Mom's head. Isn't she lucky?
She still has a massive hole in one side which I need to cover with hair and/or a bonnet. But at least she has a complete face now.

And speaking of Doll Mom, I'm having this need for her to have a knitting basket. Whether it will end up in her bedroom or in the living room remains to be seen. Or maybe even the music parlor but probably not. But I do know she will have a knitting basket, and it needs to be small scale, and I'm a bit obsessive. So, I spent some more of that tornado time in the basement seeing if I could knit in small scale. I had purchased the smallest knitting needles I could find (smallest in diameter... they're still like 8" long which is taller than Doll Mom, I'll worry about that problem later) and some DMC embroidery floss and... well...
It's still a bit too large for scale, but that's no problem. I used all 6 strands of floss for this one, if I drop to 2 or 3 strands it should be just about right. One might be too small. But I made tiny knitting! Go me :)

And last but not least, here's a preview of something to come. Not the next post, but somewhere along the line. A floor!
There are so many things wrong with this picture. First of all, this is in the wrong room. I just shoved all this stuff up in the third floor boy's bedroom and library room which are still missing their divinding wall as of this picture. That's why the wallpaper seems to be angling back towards you. It really is! Secondly, I don't even think I'm going to use that wallpaper in the living room. Or either of the rooms where I made this display. I just wanted to make it look a little, well, finished. The focal point of this picture is the floor! I found this kind of brown-ish paper with tiny faint dash lines on it, and I drew all the board outlines on it to make it look like hardwood floor. Genius, huh? Just 13 more sheets of paper to draw on, and I'll have a whole house worth of floors. Here's a closer view of my work. The paper is a little lighter colored than I had in mind, but this is about the 5th thing I've tried and first that has looked anything like a wood floor so it's good enough for me!
Anyway, I think that wallpaper is going to go in the parents' bedroom. Maybe. I'm having a little trouble deciding what to put where. And I only have three rooms worth of wallpaper so far anyway. And I may end up doing carpet-like flooring in some rooms too. I'm still in flux!

Well that's all for today's ramblings. I'm leaving on vacation in a few days and will be gone a week, so no new updates for a while.

Friday, April 29, 2011

Chim Chiminey, Chim Chiminey, Chim Chim Chiree!

I finally finished the chimney and put it back on the house. 
Hello there!  Oh how I love the Doctor.  *drool*

Sorry, I seem to have gotten a bit sidetracked there.  Also, I'm totally writing this in a British accent.  You just can't hear it. 

Anyway, wanna know how I did the bricks on the chimney?  I think I had a moment of brilliance.  The last thing I wanted to do was to measure off a bunch of tiny rectangles and paint them with a little brush.  That sounds like work, and I'm lazy.  No, wait.  Not lazy, "resourceful".  Yep that's it!
I took one of my foam brushes, cut out a piece of it that was the size I wanted the bricks to be, cut a slit in one end, and glued it to a skinny stick.  Instant bricks!  Dab in the paint, dab on the chimney.  I'm feeling brilliant, momentarily.

Okay that's enough with the conceited attitude.

I've also been making progress on the wiring.  No, really!  I swear, I have!  It's just taking forever.  I want to do this so it'll last, because I'm going to wallpaper over top of the wiring and I don't want to ever have to rip out the wallpaper to get at the wiring to fix something.  So, I'm taking my sweet time and doing it as well as I possibly know how.  It helps that technology has improved a lot in the last 30 years.  I read that tapewire was invented in 1976 which means it was still pretty new when Grandpa went into the house building business.  Lots of changes since then. 

I actually have all the tapewire in all over the house except for the girl's bedroom and a couple little extra pieces if I decide to put switches in.  I did learn how to wire switches, so I can turn rooms on and off.  But I'm having an inner debate on whether or not to actually do it.  Anyway, here are a few pics of the wiring work:
That's an in-progress picture.  Also, Chick-fil-A Diet Lemonade on the top floor, and Mystery Science Theater 3000 on the laptop.  The lemonade's in the styrofoam cup, I may love Chick-fil-A Diet Lemonade but not enough to put it in a wine glass.  The wine glass is there because it's holding all the little brass nails.  This was fairly early in the wiring process.. I ran a line all around the base so I can put in outlets for Christmas lights, and ran the main line up through the middle of the house.  And I've started in on the main floor in the previous and following pictures. 
I had to prop a Mag-Lite up on the loveseat so the light would shine on my work.  Wiring is tedious and dull, and even worse in the dark.  (sorry about the upskirt shot on Doll Mom, I had her out to measure how high to place things and she's taking a nap right now) I possibly put in more wiring than I'll actually need, but you can always have extra wiring sitting around doing nothing, and like I said before it's just about impossible to add any more wiring after the wallpaper goes in.
Hey look I finally got the outside light wired in!  (poke the picture to make it larger and see the extremely fine wires I have to work with.  it's a bit crazy)  (on second thought, you can't see the wires... maybe next time I'll take an even closer picture)  Oh, speaking of wires, I forgot to mention this earlier:
Did you know if you have hot glue on something and you want to get rid of it, you can just hit it with a hair dryer and it'll soften up?  I got all the old wiring out from under the house.  Yep, that's the underside of the dollhouse. 
And here it is, the moment of glory.  I put in the tapewire, I push in all the little 1/8" brass nails to make the connections, I turn on the power cord... and I hold my breath while poking the wire with the electric tester.  And look, it lights up!  Whew!

Moving on to the second floor:
I sure now how to use a lot of tapewire, don't I?!  I actually ran out before I finished.  My kit had 45 ft... FORTY-FIVE FEET... of tapewire.  And I ran out halfway through the third floor.  Seriously.  I worked until I had to quit.  I put in a few extra little pieces to places I might someday want a light, so that took extra tape.  And the double line in the above picture is because the one on the left is the main that goes through all three floors, and the one on the right is just for the kitchen lights.  I had to do it that way so I could put a switch in if I want to.  I already own one switch, and I think I'll definitely use it in the kitchen here.  I have most of the other rooms set up to put switches in too if I want to, but I'm not sure I'm going to.  Maybe.  We'll see.  I did take the time to put all the extra tape in, I might as well put it to good use.  But I need to buy more switches.  And do the extra work.  So, yeah.  We'll see.  But first, I need about 5 feet more tape, and some hanging light adapters so I can make them plug-in instead of hard-wire.  Easier replacing in the future. 

Random subject change: I'd been having an inner debate about the kitchen set.  (second time I used "inner debate" in this post.  allow me to translate... inner debate = talking to oneself.  don't ask)  Part of me wanted to replace it because it doesn't really go with the rest of the house.  It's all plastic and... plastic.  And 1970s.  But there's another part of me that's wanting to keep as much of the original stuff as possible, and is also a tightwad.  And I didn't want to spend the money on a new kitchen set... especially since the one I really like is $70.  Yeah.  So I studied the old set, and started thinking about how I might be able to make it less 70s, and disguise the fact that it's all plastic.  And I actually was getting things figured out.  Right up until I realized that:
Even with her not-yet-repaired busted skull, Doll Mom is WAY taller than the cabinets.  It's like a kid's playset for a doll.  A decision was made for me!  New furniture it is.  Now if only I can find something I like that isn't $70. *sigh* 

Well this post has been a random hodgepodge of unrelated things.  So I guess the only thing left to do is to sign off with a non-dollhouse picture.  Dan and I made ground goop for the train layout last weekend.  We're building up the hillside where the elevated track goes.  I think the train layout is going to have to stay with the house forever, there seems to be some goop on the walls.  Funny thing is this is kind of dollhouse related because ground goop was the inspiration for dollhouse stucco.  Different color, different scale, same idea. 
On that note, I should go be productive in my real house.

Wednesday, April 13, 2011

Help, I'm Stuck... Oh!

No, wait.  Stucco.  Yeah that.  Not stuck at all, in fact I've made a lot of progress. 

Dollhouse got a makeover!  Check out this beauty:
Okay picture quality may not be the best.  And don't zoom in too much, I still have a ton of touch-ups to do.  And I still need to do some landscaping and put flowers in the window boxes.  But... well.... look at it! 

It all started with an attempt at homemade stucco:
See, there's a funny story.  I could buy dollhouse stucco.  It would have cost me about $40 to buy enough for my entire house.  Or, I could buy $6 worth of white paint, $1.99 in fine decorator sand, and use the Celluclay we already had for the train layout.  Look at me being all economical!  In fact I could have used paint I had around the house too, but my only white paint was semi-gloss and I wanted flat.  Anyway, it only took about 300 attempts to get something that actually resembled stucco (instead of resembling random bits of sand stuck to a plain flat wall) Thankfully I had the brains to test on a spare scrap of wood instead of the house itself.  In any case, once I was happy with the spare wood, I tested again on the doghouse.  (the white on the dollhouse in the background of the above pic is just a base coat of plain white paint) 

Once I got all the walls stuccoed, then I painted the timbers brown.  Here are a few more pics:


*Still haven't done anything about the chimney issue.  I've had a change of heart from the original plan.  Wait, did I already say this?  Crud, I can't remember anything.  Well, the plan now is to stick the original chimney back on there where it was, and put either a wood stove in the music room or a small fireplace in the parents' bedroom or both.  And then build a new chimney for the other side of the house to go with the fireplace I put in the living room.  Well, I will be putting it in the living room.  The house is completely gutted right now. 

Now that I'm done with painting, I hope Dan will have time in the near future to build a new table for the house.  It's been sitting on that crappy ancient card table forever, and the table's getting a little swaybacked.  Which means the turntable doesn't always spin so well.  The turntable is fine, but the edges of the card table get in the way.  And Dan's really good at making sturdy tables, he made a bunch for our train and for my dad's.  I think he comes by the woodworking naturally, his dad is really good at it too!  Dan's is a bit more industrial, his dad makes furniture and decoration and stuff.  Check out the new nightstands he just made me! (warning: non-dollhouse picture)
I'm such a spoiled daughter-in-law!

But I digress.  Coming soon to a dollhouse website near you:
No, not quite.  Close, but still missing something.
That's it!  There's a welcoming light on the front porch!  Before anyone gets too excited though...
Yep, that's me all hunched up behind the dollhouse making a rather redneck connection... the light is wired through the walls, but the tapewire isn't in the house yet.  I'm holding the cables from the transformer up against the lamp's dangling wires on the backside of the wall. 

But I did successfully install the wiring for that lamp!  I know how to create light.  Next up: actually putting the tapewire in the house.

Monday, April 4, 2011

Put a hat on it! And a light coat

Hey check it out!
I stained and varnished all the shingles.  (not shown: the swing and doghouse, also with stained and varnished shingles)  If you're wondering why the change of background scenery, I put some wood conditioner on under the stain (28 year old untreated wood likes to be conditioned) and that stuff STINKS TO HIGH HEAVEN!  I started doing it in the basement and I couldn't stand it, had to move out to the garage.  Luckily my lawn mower was in the shop getting a tune-up so we put the dollhouse right inside my lawn mower's garage door.  Yes, my mower has its own garage door.  My mower is special.  That has nothing to do with the dollhouse though. 

Anyway, thankfully after also staining and varnishing, the thing doesn't smell nearly as bad anymore.  It gets to come back inside tonight. 

The walls/trim/etc (inside and out) also got a good coating of wood sealer.  Nearly three decades of being exposed to the elements (you know, the extreme weather conditions of... a basement... umm, yeah) left the wood a little dry and splintery, it needed some tender loving care.  Or at least a coat of sealer. 

It's happy wood now. 

Preview of the next post: since I'm on a roll with the outside, and still haven't figured out exactly where I want all the wiring to go on the inside, I'm going to go ahead and finish giving it a facelift.  My dollhouse is so vain!

Friday, March 25, 2011

Demolition! (not nearly as destructive as it sounds)

First, I have to show this because I think I'm a genius.  There was this mystery board that was in the bag full of "extra" stuff for the dollhouse, but I had no idea where it came from or what it did. 
But I think I found a home for it.  Look, it (mostly) fits!
It makes more of a ceiling for that bedroom...
And a bit of an attic space.  Which is good, because I needed somewhere to store the Christmas decorations.  I don't have any Christmas decorations yet, but just pretend with me. 

Honestly I have no idea if that was the original intent of that board, but it seems to fit in there quite nicely and I like it.  I haven't glued it in yet, I have a lot of other work to do on the place first. 

Speaking of which... check out the outside of the house!
What?  You don't see it?  Here:

All the scallop-trim is glued back on, along with the missing window boxes and that frame around the window on the other side of the swing.  The front door frame is once again stuck to the house where it belongs, and the scotch-tape-repair on the octagon window has been redone with glue.  I still need to sand down the front door because it has apparently swelled or warped over the years, or the company didn't have the die-cut the right size to begin with, and doesn't quite fit inside the frame anymore, and the same for the French doors to Girl's room.  You can't tell very well from this angle but I've taken the French doors clear off their hinges.  I started sanding them... and then got mad and quit because, well,
ouchie splinter.  A little do-it-yourself surgery later, and I am splinter-free.  I haven't gone back to the sanding yet though.  Instead I am cleaning the real house in preparation for company.  And mired in never-ending trim painting.  (warning: non-dollhouse picture)

I haven't painted the crown moulding yet, but the window frame is done.  That is one stark difference.  Yeesh.  I definitely needed to do this.

Also, why do I go spontaneously British?  "Moustache", "moulding"???  Weird.  

But speaking of sanding (I was speaking of sanding, wasn't I?) check out the inside of the dollhouse!
(this is where "demolition" came from)

All the old tapewire is out!  I know you can still see some lines, but that's just where the wood discolored under the old copper.  And I've removed most of the wallpaper too.  Some of it just came right out, no problem (see: most of the kitchen and the bottom 3/4 of Baby's old room)  Some of it partially came out with a little effort (see: Mom and Dad's bedroom, one wall of Girl's room you can't see in this picture) (that last note was for those of you with x-ray vision) And some of it wouldn't budge under any circumstances (see: Boy's wall, top 1/4 of Baby's old room, other walls of Girl's room - with your super specs)  The stuff that refused to play along is just getting a light sanding and then I'm going to paper right over it with the new stuff.  I figure if it hasn't let go in the first 30 years, it's probably not going to let go any time soon. 

Preview for the next post:  Yeah I got nuthin'.  I'm at a bit of a standstill until I figure out how I want to wire the place.  I have a few ideas.  The problem is I'm trying to perhaps be a bit too fancy for my own good.  I discovered there are dollhouse light switches, and suddenly I'm having visions of being able to turn lights in some rooms off while lights in other rooms are on...

Except I'm not an electrician.

I barely understand the basics of an open circuit, so I have no idea why I think I'll be able to wire switches. 

Monday, March 21, 2011

On the First Day...

... Trish said "Let there be light" and there was light. 

(was that blasphemy?  oh well, probably not the worst thing I've done this week... and it's only Monday)

I spent some time this weekend doing a little demolition on the inside of the house.  No, not with a sledgehammer.  Mostly with my thumbnail.  I don't think my right thumb will ever be the same.  Ow... ouchie... ooowwwwww.  Once I got the original lights out, I touched the wires to the terminals on my new transformer to test them.  To my shock and delight, they all still work!  (heh heh I said "shock"... electrical joke.  hee hee)  Well, I couldn't test the TV because I don't have the proper outlet for that plug (plus I'm thinking about leaving the TV out of the dollhouse anyway, doesn't really fit with the era... color TV and top-flush toilets aren't generally found in the same house) and the hanging Tiffany lamp has a burned out bulb but I put a different bulb in and the fixture itself still works. 
That is really great news because it means I can put temporary lights in the house now and test all the wiring as I'm installing it.  I also read up on how to install the wiring and prep it for hard-wiring lamps without actually having the lamps already.  So that saves me from needing to spend a small fortune to get all the light fixtures I eventually want.  I can get them bits and pieces at a time.  Life is good!

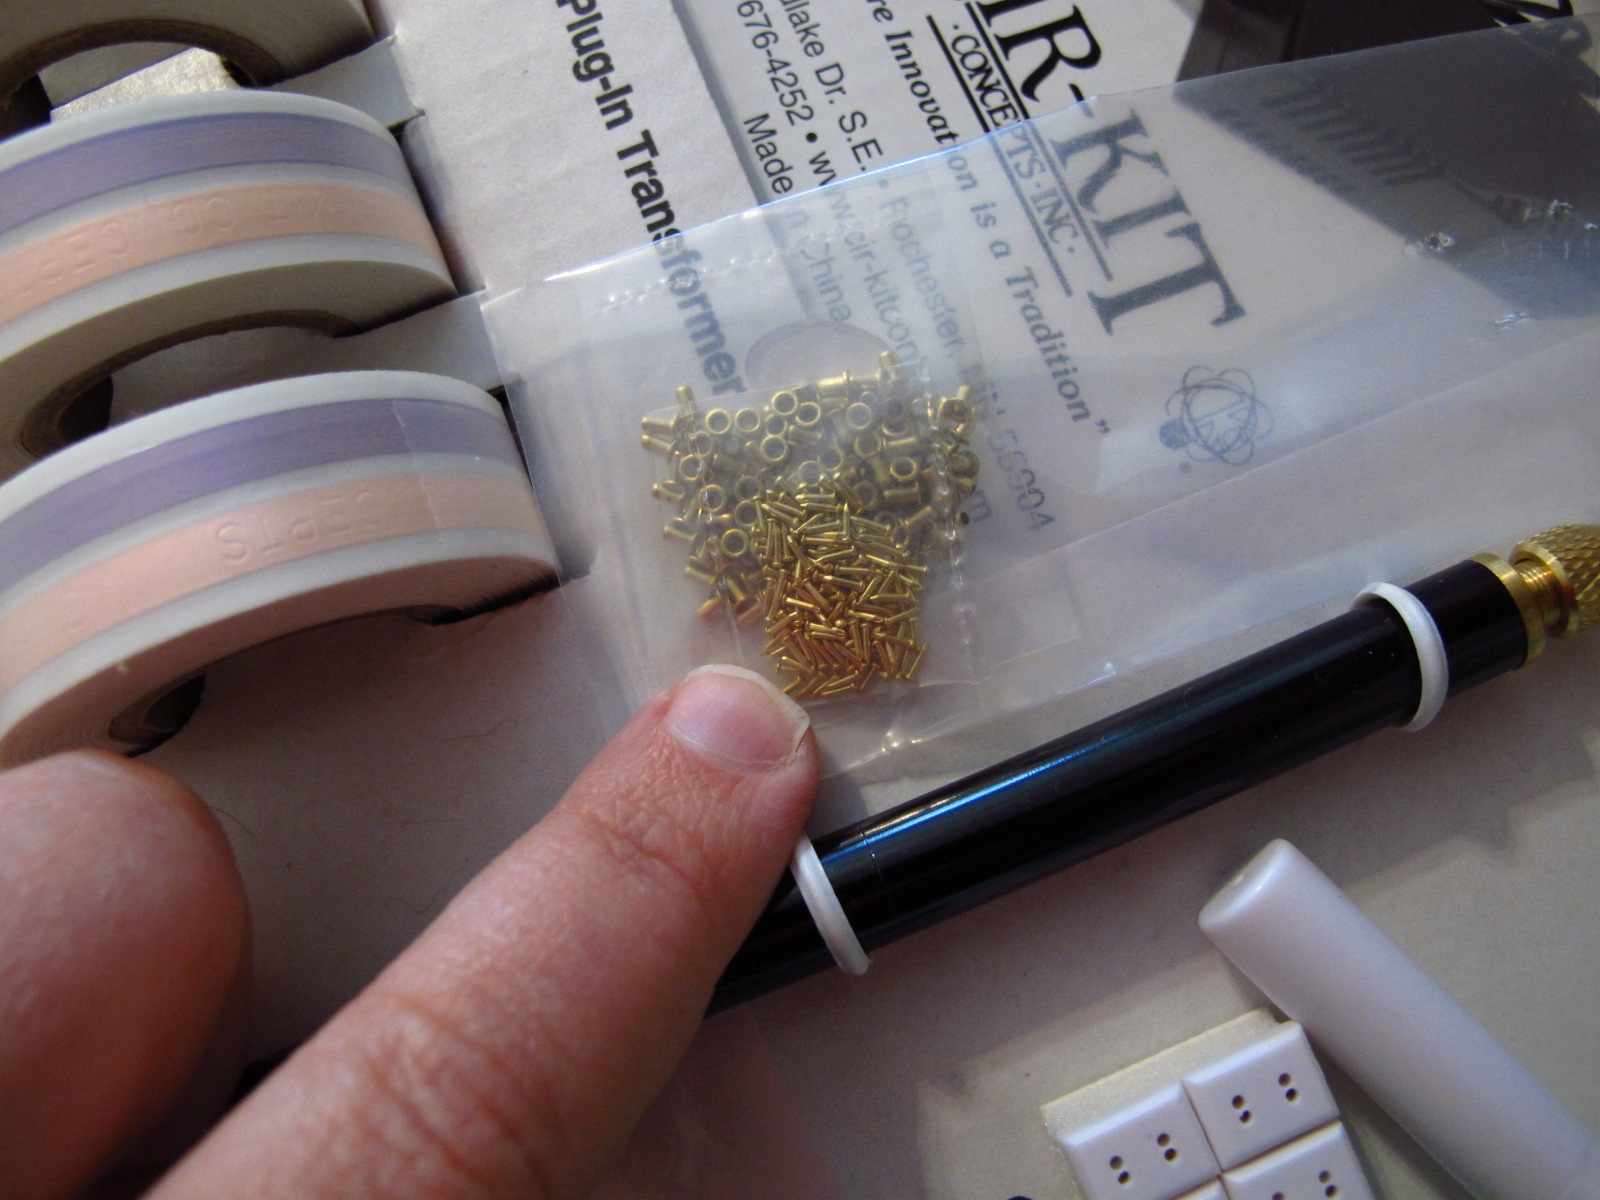
Here's my new wiring kit:
They even sent me a free lamp.  I don't know where I'm going to put that lamp, but I bet I figure it out.  Wanna zoom in on the kit?
Those are the teeny tiniest little brass brads I've ever seen.  I don't have tweezers that small.  Gotta go buy a new tool.  Oh boy is Dan going to have a heyday picking on me about that!  And aren't those the most adorable little itty bitty outlets down at the bottom of the picture?!  Awwww!  And the white thing next to them is a little midget electric tester.  It's so cute!  I can't wait to start laying wire just so I can test it.

I might need to get out more.

In closing, here's a preview of what will be coming in my next post:

1. Pieces of trim that I can't find a home for on the dollhouse... I took all the trim I could identify and glued it back on, and I'm still missing a few things, but these pieces don't fit anywhere from what I can tell  Weird. 
2. Some torn out wallpaper
3. I read a helpful hint on another dollhouse website to keep your Tacky Glue upside down in an old coffee mug so the glue is always at the nozzle.  I don't drink coffee.
4. Yes!  The picture is down!  Saving the frame, probably going to use it again.  The pic?  Not so much.
5. Ripped out old copper tapewire.  Kinda looks like a Christmas bow.  Worst gift wrapping ever... it'll cut your fingers up. 
6. Mystery board.  Mom and I couldn't figure out why it existed.  I think I did.  Stay tuned!

Wednesday, March 16, 2011

Speaking of things that need repairs

(Disclaimer: There are three posts in a row here where I am detailing the starting point of my new project.  I may get a little smart-alecky in some comments, but I want everyone to know that I do truly love this dollhouse and think it is beautiful.  And I especially love that it was put together by my Grandpa, and decorated by others in my family.  That said, there are a few things that I definitely want to change now that I can!)

Meet the Dolls!
You know what?  I have mixed feelings about this.  About dolls in general, not the mom's busted skull.  Although the dad's moustache is a little disturbing.  Wait, what was I saying?  Oh yeah.  See I've looked at a lot of other well-finished dollhouses online over the last few days, getting ideas and inspiration, and there have been some just drop-dead gorgeous houses that almost look real in the pictures, right up until you see the dolls.  And then it brings me right back to reality.  It's kind of like in a movie when you just get all into what's going on, and then they dial a 555 number and a neuron misfires in your brain and you remember that you're sitting in a theater with someone else's old popcorn stuck to your feet.  No matter how good your dolls are, they're still dolls.

Also I just realized that I said "a lot of OTHER well-finished dollhouses" when I should have just said "a lot of well-finished dollhouses".  Mine is well-assembled.  The finishing is, well, unfinished to say the least.

Back to the dolls.  I'm sure I'll leave them in the house, because otherwise it's kind of creepy to be peering into a house while the owners are away.  But I just had to get that off my chest. 

And speaking of things which are well-assembled. 
Yeah, Real Mom and I had to glue Girl's head back together.  The back room of Mom and Dad's basement has a cement floor, and I had dolls with porcelain heads.  You do the math.  Their bodies are soft, but their heads are shatter-prone.  We found all the pieces but that one, and did a pretty good job gluing. 
Which brings me to Doll Mom.  I'll be honest with you, I didn't even remember that her head had broken.  I wonder if it was a late-breaking story.  Get it?  Breaking?  Oh man, I gotta go lie down. 
She's missing a bigger piece!  Also, she's not really hunch-backed.  I'm just holding her funny.  The good news is her face is all still here (my fingers are holding the broken pieces in place)
I found a fairly easy-to-understand tutorial online showing how to put realistic-looking hair on doll heads, so I think a quick trip to the salon will fix up Momma and Girl quite nicely.  Both their faces are fine, it's just random skull chunks that are missing.  If not hair, then hats or bonnets. 

Anyway, that was why I said a couple days ago that Doll Mom didn't help pack for their big move.  It's hard to do much of anything when you have a literal hole in your head.

That is going to be the very last thing though.  Like I said, dolls kinda trip me up a bit.  And the biggest reason I wanted to take on this project was to get the lights going again.  I love random lighting in a room.  I think my favorite thing about Christmas is just having the Christmas lights on and not the overhead lights and lamps.  Oooooooh yeah and I want Christmas lights for the dollhouse!  Thank goodness that's still over a half a year away... I should probably get the rest of the lights working first.

And speaking of working... maybe I should finally get started!